Mozzarella Recipe
Equipment:
1. At least an 8 quart pot, either enameled or stainless steel. (Do not use aluminum, cast iron or other reactive pots)
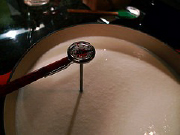
2. Thermometer. (A candy thermometer will probably work but a good quick read digital thermometer is much better for accuracy.)
3. 2 small glass cups to dissolve the Citric Acid and Rennet in.
4. A big strainer to strain the Curds from the Whey. A fine mesh Kitchen Spider is the best.
5. A long sharp knife to cut the Curds up with.
6. A slotted spoon to stir the Curds and dip them out with.
7. Large bowl for the drained off Whey. (Glass is best)
8. Smaller bowl to put the Curds in. (Glass is best)
9. Microwave
10. Rubber kitchen gloves
Ingredients:
1 gallon Longmont Dairy milk, any percent milk will work, if you do not have access to Longmont Dairy milk, make sure to use milk that is NOT ultra high temperature pasteurized. Minimal pasteurized milk is best. I like to use our Whole Milk, it’s the least processed milk that we have and you get the highest yield of cheese per gallon of milk. If you use the high temperature pasteurized milk you’ll never get passed having ricotta cheese. You can make ricotta with almost any milk.
2 ¼ cups of non chlorinated water
1 ½ teaspoon citric acid
¼ tablet rennet, ½ tablet for dryer cheese or ¼ teaspoon of the liquid rennet. I like mine soft, so I use ¼ tablet or the ¼ teaspoon of liquid rennet. I’ve had the best results with liquid rennet. I get mine from
Cheesemaking.com from South Deerfield, Massachusetts. We’re on their list of best milks to use to make cheese.
2 teaspoons non iodized salt or to taste.
First, be sure to give you’re your ingredients time to dissolve in 1/4 cup of non-chlorinated water, twenty minutes or so. The rennet and citric acid need to be dissolved in separate containers. Slowly heat the container with the milk in a hot water bath in the kitchen sink or on a low temperature stove top. When milk reaches 70 degrees add the diluted citric acid slowly

to the milk and gently stir continually. Little secret, if you have the time, let the milk sit out and come to room temperature, it takes about two hours.
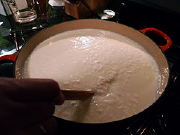
Once the milk reaches 88 – 90 degrees take the milk off the heat source and add the diluted rennet. Stir gently with an up and down motion for 30 seconds, then let stand for 10 minutes. Milk should look like nice custard. It’s starting to look like cheese. Take a long knife and cross cut curd in one inch cubes. Reheat the water in skink or put the pot back on a low setting

stove top and continue heating to cheese to 105 - 106 F. Stir gently so that you don't break the curds up too much.
By the time it reaches 105°F, it will start to look a little chunky. At this point, take the container away from the heat and let it sit for 5 to 10 minutes.
After resting for 5 or 10 minutes you'll be rewarded with larger chunks of cheese curds. If you wanted to make cottage cheese
you’d almost be done.
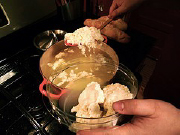
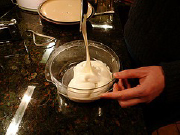
Remove the curds with a slotted spoon or kitchen spider, leaving the whey in the pan or strain the mixture into another glass container. Put curds into a microwaveable glass bowl.
Lightly smash the curds with a spoon to squeeze as much whey out of them as possible, and then drain. Microwave for 60 seconds and repeat the kneading and this is the time to add your salt, then knead the cheese again to mix the salt into the cheese. If you want your cheese to last more than a couple of days use a little more salt. The salt is one of the reasons you’re making
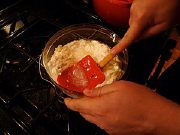
your own cheese. Use just what makes the cheese taste good to you, especially if you’re going to use the cheese right away. You don’t have to use as much salt as the commercial cheese makers use. This is also the time to add any dried herbs that you would like to flavor your cheese with. I like dried basil or thyme. This is also the time to experiment to find the combinations of flavors that’s going to make your cheese unique. You might not want to use too much of the dried herbs if this is the first time that you’ve made cheese.
Microwave the cheese for another 30 seconds. Kneading with a spoon or put on your rubber kitchen gloves and knead the cheese
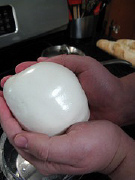
like you would with bread dough until the cheese comes together into a ball and does not stick to the spoon or your gloves. This process may have to be redone one more time if the cheese is not the texture that you would like. Do not over microwave the cheese, it may come apart on you and get a hard texture. You’ll notice that the cheese will start to get I shinny look to it. Then you’ll know you have Mozzarella cheese.
At this point you will have a soft mozzarella ball. You can stop at this point with one large ball or you can squeeze the ball into smaller balls, whatever suits your needs.
Or you can stretch and pull it like taffy until you have a cooled firmer cheese better for grating or you now have cheese sticks. You can cut the strands into 4- or 5-inch lengths. I put my cheese in an ice bath for half an hour or so to keep it in a nice round ball.
If you’re going to want to store the cheese for any length of time, use the whey that you saved earlier in a glass container. You add the whey to a sealable storage container until the cheese is covered with the whey. I put mine in a quart bag and refrigerate, if there is any left to store.